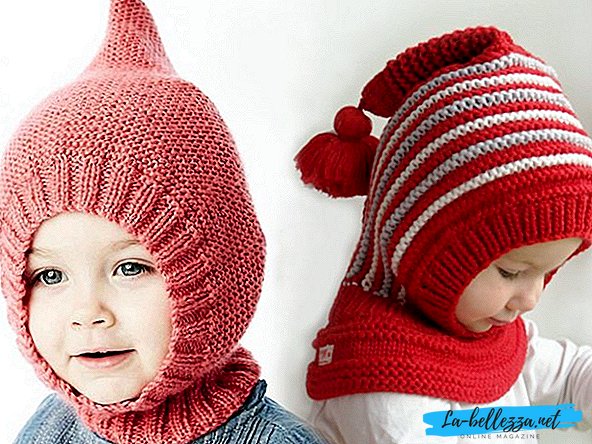
A helmet hat is a very practical and at the same time a beautiful product, which many people associate with a happy childhood. You can knit such, or a bit more relevant model, with needles.
This product made of yarn is a real salvation in the cold season for many babies who are not too worried about health, because the hat-helmet protects not only the ears and the head, but also the child's throat precisely because it is firmly attached to the neck. Therefore, to link such a product for a boy or girl is just necessary. And how the kids look in them - lovely!
Knitting hat-helmet for girls and boys
The hat-cap successfully combines two useful products: the hat itself, as well as the scarf, or rather, the shirtfront, which, moreover, can become a real decoration of a particular model. Cap-hat can be decorated with interesting volume patterns, ears, tassels, pom-poms and other cute additions.
There are a lot of possible models of helmet-caps, and each of them is good in its own way. But, regardless of the choice of model, it is very important to choose a yarn that will not be pricked, because it will constantly touch the child’s forehead, cheeks and neck. Comfort first of all, and the choice of the shape of the product for girls and boys later.
For girl
For girls, even the smallest, the visual component is important, namely: an interesting picture, bright color and a successful model. However, first of all, a knitted hat-hat for a girl should be warm and comfortable. Let's consider on concrete examples how a hat-hat for a girl knits with a detailed description.
- The Scarlet Flower
A popular model of hat-helmet for girls, which will take time and care, but the result will be a beautiful and warm product. This hat will have to knit in several stages. When knitting is used rotary and circular knitting.

Sizes helmets:
Size 2-4 years, head circumference 50-52 cm.
The height of the cap from the gum neck 20.5 cm.
Materials for work:
- Amico reel yarn (100% merino wool, 125m / 50g), consumption 150-160g;
- circular needles number 2.5, number 3 and number 3.5;
- needle;
- elastic thread (optional);
- hook without handle.
Knitting density:
1 cm - 2.7 loops; 1 cm - 5.8 rows.
Schematic construction of a hat-helmet:
 Closed and lowered loops are marked in red. Green color - added and additionally collected loops.
Abbreviations to the knitting pattern:
1l- 1 face loop.
1i- 1 purl loop.
1 to- at the beginning of the row the loop is removed as a front one, at the end of the row it knits in the wrong direction.
2vl - 2 together facial with a slope to the right.
2vlp - 2 together front with an inclination to the left (with a broach).
3c- 2 remove on the right knitting needle without knitting, 1 facial loop and stretch 2 facial loops through it with the right knitting needle.
5 butterfly- Remove 5 facial loops without knitting, stretch the thread before work.
4 butterfly - Remove 4 facial loops without tying, stretch the thread before work.
3 butterfly - Remove 3 facial loops without tying, stretch the thread before work.
Knit a bow of 5 loops - when turning knitting: 2i, insert the right knitting needle for work through the outstretched loops and transfer them to the left knitting needle, then knit it out together with the next loop of the isanic line, to make one loop, 2i.
With circular knitting: 2l, insert the right knitting needle under the broach from bottom to top, then into the front loop from left to right (as when knitting the front loop) and knit the broach with the front loop to make 1 face loop, 1l.
Knit a bow of 3 loops - for circular knitting: 1 l, insert the right knitting needle under the broach from bottom to top, then into the front loop from left to right (as when knitting the front loop) and knit the broach with the front one to make 1 front loop, 1 l.
Working process:
Knitting begins with a neck. On the auxiliary thread with needles No. 3, dial 110 points, join the knitting into a circle and knit 1-2 rows with front loops, switch to the primary thread and knit 1-2 rows with facial loops (to make it easier to lift the loops from the auxiliary thread), then 5 cm (20 rows) with a rubber band for 1 person. on 1 out.
Add evenly 20 loops from the broach: (5 l, increase, 6 l, increase) x 10 times. Total 130 loops.
Go to the needles of 3.5 mm and knit 5 rows of facial loops. In the next row, close 33 loops for the face oval, then through the row (in the front rows), decrease four more times 1 loop at the beginning and at the end of the row. Total closed to the oval face 41 loop. The needles left 89 loops.
Rapport butterfly pattern is 10 loops and 10 rows, rapport of a butterfly of 5 loops and 5 faces. loops alternate in checkerboard pattern.
Knitting butterfly pattern according to the scheme:

How to fit a butterfly pattern:
Row 1: individuals. Row: close 33p, 1k, 5l, (5 butterfly, 5l) x8 times, 5 butterfly, 5l, 1k.
After the first row begins knitting knitting.
Row 2: out. Row: 1k, 95i, 1k;
Row 3: 1k, 2vl, 3l, (5 butterfly, 5l) x8 times, 5 butterfly, 3l, 2vlp, 1k;
Row 4: 1k, 93i, 1k;
Row 5: 1k, 2vl, 2l, (5 butterfly, 5l) x8 times, 5 butterfly, 3l, 2vlp, 1k;
Row 6: 1l, 91i, 1k;
Row 7: 1k, 2vl, 1l, (5 butterfly, 5l) x8 times, 5 butterfly, 1l, 2vlp, 1k;
Row 8: 1k, 89i, 1k;
Row 9: 1k, 2vl, (5 butterfly, 5l) x8 times, 5 butterfly, 2vlp, 1k;
Row 10: 1k, 1i, (knit a butterfly, 5l) x8 times, knit a butterfly, 1i, 1k.
Next, knit in height 3 rapport pattern.
Rows 11, 13, 15, 17, 19: 1k, 1l, (5l, 5 butterfly) x8 times, 6l, 1k;
Rows 12, 14, 16, 18: 1k, 87i, 1k;
Row 20: 1k, 1i, (5i, knit a butterfly) x8 times, 6i, 1k.
Rows 21, 23, 25, 27, 29: 1k, 1l, (5 butterfly, 5l) x8 times, 5 butterfly, 1l, 1k;
Rows 22, 24, 26, 28: 1k, 87i, 1k;
Row 30: 1k, 1i, (knit a butterfly, 5l) x8 times, knit a butterfly, 1i, 1k;
Rows 31, 33, 35, 37, 39: 1k, 1l, (5l, 5 butterfly) x8 times, 6l, 1k;
Rows 32, 34, 36, 38: 1k, 87i, 1k;
Row 40: 1k, 1i, (5i, knit a butterfly) x8 times, 6i, 1k.
Then, 4 times in the front rows, add 1 loop at the beginning and at the end of the row (only 2 loops in a row) from the broach, not forgetting to knit the main pattern. Total 97 loops.
Row 41: 1k, increase, 1l, (5 butterfly, 5l) x8 times, 5 butterfly, 1l, increase, 1k;
Row 42: 1l, 89i, 1l;
Row 43: 1k, increase, 2l, (5 butterfly, 5l) x8 times, 5 butterfly, 2l, increase, 1k;
Row 44: 1k, 91i, 1k;
Row 45: 1k, increase, 3l, (5 butterfly, 5l) x8 times, 5 butterfly, 3l, increase, 1k;
Row 46: 1k, 93i, 1k;
Row 47: 1l, increase, 4l, (5 butterfly, 5l) x8 times, 5 butterfly, 4l, increase, 1k;
Row 48: 1l, 95i, 1k;
Row 49: 1l, 5l, (5 butterfly, 5l) x8 times, 5 butterfly, 5l, turn the work inside out to yourself and from left to right to get 33 loops. Next, knit in a circle.
Row 50: A row fits on the front side, but is wrong. 6l, (knit a butterfly, 5l) x8 times, knit a butterfly, 6l, 33l + 1l loop of the next row. The beginning of the row shifted 1 loop to the left.
How to knit a "butterfly" with circular knitting:
2 face loops, then the right knitting needle should be inserted under the pull-ups from bottom to top, then into the face loop from left to right (as when knitting a face loop) and knit pulling with the face loop together to make 1 face loop, 2 face loops.
Next, knit in height 3 rapport pattern:
Rows 51, 53, 55, 57,59: (5 butterfly, 5 l) x 13 times;
Rows 52, 54, 56, 58: 130l;
Row 60: (knit a butterfly, 5l) x 13 times;
Rows 61, 63, 65,67,69: (5l, 5 butterfly) x 13 times;
Rows 62, 64, 66.68: 130l;
Row 70: (knit a butterfly, 5l) x 13 times;
Rows 71, 73, 75, 77, 79: (5 butterfly, 5 l) x 13 times;
Rows 72, 74, 76, 78: 130l;
Row 80: (knit a butterfly, 5l) x 13 times.
The formation of the top according to the scheme:

Knit the top of the head according to the scheme:
Rows 81, 83, 85: (5l, 5 butterfly) x 13 times;
Rows 82, 84: 130l;
Row 86: (5l, 2vl, 3l) x 13 times = 117p .;
Row 87: (5l, 4 butterfly) x13 times;
Row 88: (5l, 2vl, 2l) x13 times = 104p .;
Row 89: (5l, 3 butterfly) x13 times;
Row 90: (5l, knit a butterfly from three loops) x13 times;
Rows 91, 93, 95: (5 butterfly, 3 l) x13 times;
Rows 92, 94: 104l;
Row 96: (2vl, 6l) x13 times = 91p .;
Row 97: (4 butterfly, 3 l) x13 times;
Row 98: (2vl, 5l) x13 times = 78p .;
Row 99: (3 butterfly, 3 l) x13 times;
Row 100: (knit a butterfly from a pair of hinges, 3 l) x13 times;
Row 101: (1l, 2vlp, 3l) x13 times = 65 p .;
Row 102: 65l;
Row 103: (1l, 2vlp, 2l) h13raz = 52p .;
Row 104: 52l;
Row 105: (1l, 2vlp, 1l) x13 times = 39p .;
Row 106: 39l;
Row 107: (1l, 2vlp) x13 times = 26p .;
Row 108: 26p;
Row 109: 1l, (2vlp) x 12 times, reshoot 1 face loop from the left knitting needle to right knit and knit 2vlp…
Pull off the remaining 13 loops.
Height of decrease: 6 cm.
Features of knitting some loops in the schemes:


How to knit a shirt front hat:
Carefully uncoil the auxiliary thread and lift 110 loops.
For the shirtfront, you can use any pattern and pattern or knit raglan. I took a simple scheme of leaves.
Pattern repeat at the beginning of 10 loops: 5l, 5i. Only 11 rapports.

 The scheme of the shirtfront for circular knitting.
Knitting the shirtfront:
1) (5l, 5i) x11raz;
2) all even rows fit in a pattern;
3) (2l, nakid, 1l, nakid, 2l, 5i) x11 times = 132 p .;
5) (7l, 5i) x11 times;
7) (3l, nakid, 1l, nakid, 3l, 5i) x11 times = 154p .;
9) (9l, 5i) x11raz;
11) (4l, nakid, 1l, nakid, 4l, 5i) x11 times = 176p .;
13) (11l, 5i) x11 times;
15) (5l, nakid, 1i, nakid, 5l, 5i) x11 times = 198p .;
17) (13l, 5i) x11 times;
19) (2vlp, 9l, 2vl, nakid, 5i, nakid) x11 times;
11) (2vlp, 7l, 2vl, nakid, 7i, nakid) x11 times;
23) (2vlp, 5l, 2vl, nakid, 9i, nakid) x11 times;
25) (2vlp, 3l, 2vl, nakid, 11i, nakid) x11 times;
27) (2vlp, 1l, 2vl, nakid, 13i, nakid) x11raz;
29) (3 fl, nakid, 15i) x11 times;
30) 198l (in this series, nakida are knitted by a crossed face);
31) 198i;
32) 198l.
Close the loop.
Height of the shirtfront is 8.5 cm.
Binding face contours:
Using the hook and thread dial on the front side of the spokes 2.5mm about 136p. The number of loops must be a multiple of two.

Knit one row with purl loops, then 14 rows with a rubber 1l per 1i (3cm). With 3.5 mm knitting needles, knit one row with front loops - this is the place where the elastic band bends, then with 2.5 mm knitting needles, 14 rows of elastic bands. Width of the finished rubber band 3 cm.
If desired, on the inside of a knitted gum, knit a crochet chain around the bend with an elastic thread-elastic band.
The purpose of this thread-gum is not to stretch the binding of the oval face.
Hem the bound gum from the inside out on the open loops.

- Braided Cap
Beautiful and laconic hat with braids that will warm the restless and active girls in the cold winter. A characteristic feature of this model is the ability to fasten the product with buttons, which is very comfortable both for the child and for the mother.

The size:
Shlemik knitted on age 1.6.
Head volume 56 cm.
Knit patterns:
- Hosiery (in the front rows of knit purl loops);
- Shawl;
- "Spit" - knit of 6 facial loops:
1 row: facial loops
2 row: purl loops
3 row: leave three loops on the auxiliary needle, knit the next three loops with the front ones, and then knit the loops with the auxiliary needle, i.e. knit crossed loops
4 row: purl loops
5 row: facial loops
6 row: purl loops
7 row = 1 row.
Materials for work:
First, knit the bar, which will go on the face of the oval.
To do this, we collect 7 loops on the needles No. 3 and knit a garter stitch 125 rows. At the end of the loop close, cut the thread.
On the long edge of the resulting strip leaves 63 loops, and we need to dial 106 loops. To do this, I first crocheted No. 3 with one row of single crochets in this way: alternating 2 loops and 3 loops (I knit 2 from one loop). Next, we collect on the spokes number 4 on the long side of 106 loops.
Dialed 106 loops are knitted in the following way: 1 edge, 2 garter stitches, * 2 facial stitches, 6 spit loops, 2 facial stitches, 4 garter stitches *, 2 facial stitches, 2 garter stitches, 1 edge. From * to * - rapport, repeat it to the end of the row. We knit like 43 rows.


We divide the loops into 3 parts with 35 loops on each side and 36 loops in the middle, knit the “cap” according to the heel principle.
44th row: 35 side loops we knit according to the pattern, making of 6 loops “braids” 4 loops (close 2 loops in each “braid”); 36 loops of the middle knit in a pattern without changes; the last 35 loops are knitted according to the pattern, making 4 loops from the “braids” loops.
45th row: we knit 35 side loops according to the pattern, 35 middle loops according to the pattern, and knit the middle 36th loop with the next loop. Turn knitting.
46th row: we remove 1 loop (this will be an edge loop) without knitting. We knit 35 loops of the middle according to the pattern, and knit the 36th loop together with the next loop. Turn over knitting again.
It turns out a kind of "cap", similar to the heel when knitting socks.

We continue to knit according to the described scheme, and in the 51-52 row we begin to make symmetrical reductions in the middle 36 loops. In every sixth row we reduce 2 loops: one on each side of the central "braid" (ie, the central "braid" and 2 purl to the sides of it we do not touch, and we reduce the following loops). We continue to subtract until there are 14-16 loops left in the middle.
Knit the cap until all the side loops are finished. Close the remaining middle loop, cut the thread.

The next stage - knit the neck, like a shirtfront. To do this, on the bottom edge of the cap, type the loops with the needles No. 3 in the following way: 5 air loops for the slat (I hooked and then put them on the needles), on the bottom edge, type 74 loops and then again 5 air loops for the slat.

We knit this way: 1 edging, 6 garter stitch loops, * 2 facial stitches loops, 6 “braids” loops, 2 facial harness loops, 5 garter stitches *, (from * to * repeat 4 times), then 2 facial loops smoothing, 6 loops “braids”, 2 loops of the front smoothing, 6 loops of garter knitting, 1 edging.
On one of the slats we make button loops. To do this, at the beginning of the row, we knit 3 garter stitch loops; we make 2 nakida. And close the next 2 loops.
We get just such a hole, and above it 2 nakida.
In the next row (on the way back) of 2 nakidov we knit 2 loops according to the pattern (scarve knitting) and get the first hole for the buttons. The rest is done similarly.

We knit 16 rows without increments, then we change the needles to No. 4 and make gains. The loops are added to the sides of the "braids" and the back loops framing them. We have 5 braids, we add one loop on each side of the braid, and we get 10 loops in a row.
I added loops to the middle garter loops, gradually increasing their number. Increments are performed in the 17, 19, 22, 24, 27 rows, and so on, until we add 8 loops on each side of the "braid".

Then we knit another 6-8 rows of garter stitch without increments. Close all the loops.


For boy
Active boys are very useful hat-helmet, which certainly does not fall from the top, but on the contrary - reliably protect your ears and neck. How does a hat-hat for a boy knit? The scheme and description will help to understand this.
- Cap droplet
A cute and simple hat, similar in shape to a drop, will look great on both boys and girls. Its simple design is easy to fit, and looks very harmonious. Such a hat-hat is perfect for autumn or spring.

The size:
6/12 months (18/24 months, 4 years).
Circumference: 43 (45.5, 48) cm.
Materials for work:
- 1 skein of Bernat Softee Baby (100% acrylic, 140 g / 331 m.);
- The needles 3.75 and 4.0 mm .;
- two loop holders;
- needle.
Knitting density:
21 loops * 40 rows = 10 * 10 cm with large knitting needles, a shawl pattern.
Working process:
Using smaller knitting needles, dial 82 (86, 92) loops.
1st row (face. Side): 1 face., * 2 faces., 2 ex., Will repeat from * to last. loops, 1 persons.
2nd row: 1 out., * 2 persons., 2 out., Repeat from * to the last. hinges, 1 out.
1-2 rows is a rubber band, repeat them 3 more times.
Track. a row (faces. side): 3 faces., 2 out., 2 faces., put off 7 knitted loops on the loop holder, knit with a rubber band until last. 7 loops, turn the work and put the last 7 loops on the loop holder = 68 (72, 76) loops.
Go for the big knitting needles.
Track. row: * 4 persons., add a loop, repeat from * to the last. 4 loops, 4 persons. = 84 (89, 94) loops.
Only for 6/12 month sizes. and 4 years: knit facial, add 1 loop in the center of work = 85 (95) loops.
For all sizes: continue to knit garter stitch (each row knit with facial loops) to a height of 16.5 (18, 19) cm, finish on the wrong side.
Next, begin to perform a decrease. Knit the following 6 rows: close 5 loops, finish the row with face loops = 55 (59, 65) loops after the 6th row.
Knit the following 10 (12, 12) rows: close 3 loops, finish the row with face loops = 25 (29, 29) loops after the 10 (12, 12) -th row.
Close all loops.
Sew the back seam.
Neck:
from the front side, use smaller knitting needles to lift 56 (60, 64) loops evenly along the cap, starting from the set loops to the back seam and to the set loops on the other side, remove the set loops for the same needles = 70 (74, 78) of the loops.
Track. a row (izn. party): 1 izn., * 2 persons, 2 izn., to repeat from * to last. hinges, 1 out.
Track. a row (izn. side): 1 person., * 2 ws, 2 people., repeat from * to the last. loops, 1 persons.
1-2 rows is a rubber band, repeat them to a height of 5 (5.5, 6) cm., Finish from the front.
Close the loop with a rubber band.
Sew a rubber stitch (in the center of the front).
- Hat helmet for newborns
Another interesting model of the cap, which looks great on boys, but when choosing a brighter yarn will suit even the smallest girls.

The size:
46 cm
Materials for work:
- YarnArtCharisma yarn (80% wool, 20% acrylic, 100 g / 200 m.) -1 skein;
- straight and circular needles 3.5 mm (the length of the circular needles 40 cm).
Knitting density:
23 loops * 34 rows = 10 * 10 cm. 2 * 2 elastic bands.
Working process:
Front shirt
Dial 60 loops.
Knit gum trace. way: chrome. loop, * 2 people., 2 out., repeat from *, finish 2 people., Krom. a loop.
Continue knitting with a rubber band - 24 rows.
Simultaneously, in the 7th row of the gum, perform subtractions: mark the center 2 loops with a marker, knit with a rubber band until 2 loops in front of the central loops, 2 together, 2 faces. (central loops), 2 together, to finish a row with a rubber band.
Next loop to knit on the pattern.
Repeat the decrease in 11m, 15m and 19 p. (Ie in each 4th row - 4 times) = 52 loops on the spokes.
Tie up to the 24th row.
Trim the thread and set aside the part.
Back of the shirt
Dial 60 loops.
Knit with a pattern of gum as for the front, at the same time perform a subtraction as the front in the 13m, 17m, 21m and 25m rows.
Just knit 30 rows of gum.
The threads do not break off.
Connecting the shirt
Continue knitting the back stitches with the front loops on the circular needles.
Knit in a circle gum 2 persons., 2 out. - 3 cm. (10 rows).
Cap
Put the center 18 hinge parts in front of the hinge holder.
Continue knitting with rotating rows, simultaneously closing 2 loops on each side in each second row - 5 times = 66 loops.
Knit gum pattern to a height of 13 cm from the pending loops (= 44 rows).
Divide the loops into 3 parts: 21 loops, a marker, 24 loops, a marker, and 21 loops.
Track. ряд (лиц. сторона): вязать резинкой 21 петлю до маркера, переснять маркер, вязать резинкой след. 23 петли (1 петля перед маркером), снять петлю, 1 лиц., накинуть снятую петлю на провязанную, повернуть работу.
След. ряд (изн. сторона): снять петлю, вязать 22 петли резинкой, 2 вместе изн.(маркер снять), повернуть работу.
След. ряд (лиц. сторона): снять петлю, вязать 22 петли резинкой, снять петлю, 1 лиц., накинуть снятую петлю на провязанную, повернуть работу.
След. ряд (изн. сторона): снять петлю, вязать 22 петли резинкой, 2 вместе изн., повернуть работу.
Повторять 1-2 ряды пока все боковые петли не будут убавлены = 24 петли на спице.
След. ряд: вязать 24 петли резинкой, поднять 25 петель равномерно вдоль боковой стороны шапки, вязать петли с держателя петель как *1 изн., 1 лиц. повторить от * для всех 18ти петлях, поднять 25 петель равномерно вдоль второй боковой стороны шапки = 92 петли.
Продолжить вязание по кругу резинкой 1 лиц./1 изн. - 8 рядов.
Закрыть петли резинкой (как закрывать петли резинкой, смотрите видео).
Шьем подкладку:

Выполняем выкройку шапки Вашего размера в натуральную величину (пользуемся выкройкой, которую нарисовали при вязании шапки, переводим количество петель и рядов в сантиметры, использовав плотность вязания).
Берем ткань - флис. Проверяем какая сторона тянется (тянутся должно в ширину шапки).
Переносим выкройку на ткань, вырезать.
Сшить два шва на макушки шапки (смотрим выкройку), чтобы сшить короткую и длинную стороны, я натянула короткую сторону до размера длинной, закрепила булавками и сшила.
Пришить первую деталь подкладки к вязаной шапки.
Повторить для второй детали. Вторую деталь натянуть по ширине на всю окружность шапки.

Video lesson
Начинающим вязальщикам всегда легче освоиться с новым видом вязания, если предварительно посмотреть несколько полезных видео-уроков по созданию той или иной модели изделия. В данном случае речь пойдет о теплой и красивой шапочке соединенной с ажурной манишкой.
Видео урок для начинающих - как связать спицами шапку-шлем: