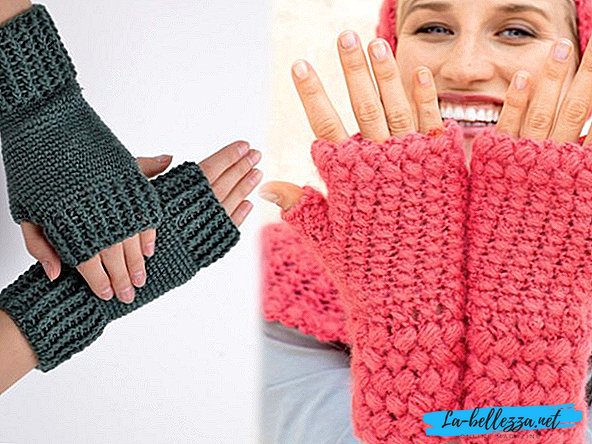
Crochet mittens are a beautiful accessory that can be either warm or perform decorative functions, especially when it comes to airy open-work gloves without fingers. Creating them with a hook is easy enough, especially if you pick up simple diagrams with descriptions for beginners, such as those presented below.
These mittens without fingers can be presented to girls, boys, women and men - there are a great many styles and models of mitts, and many of them have their own individual charm, which is passed on to those who wear them. That is why many newcomers want to learn how to knit mittens with their own hands, because you can please not only yourself with an interesting work, but also those around you with a beautiful and comfortable thing.
Another interesting fact is that mitts are crocheted for all occasions - starting with casual casual style and ending with wedding. Options for a variety of schemes, there are many. Let us examine in more detail those of them that will be able to bind to novice needlewomen.
How to crochet mitts - description schemes for beginners
Consider several options for crochet mitts, which with the help of diagrams and descriptions will be mastered by all novice knitting fans. Let's start with the lightest models and move on to simple types of mitts with an individual style.
The simplest model

To perform the work useful detailed master class on "Mitts for beginners crochet." Here is a simple model of mitts for children, connected by some of the simplest patterns created by crochet - semi-columns, air loops and single crochet columns. Depending on the chosen color of the yarn, this model of mitts is perfect for both boys and girls.
Sizes of mitts:
For 5 years (arm circumference - 15 cm, mitts height - 12 cm).
Materials for work:
- Jeans yarn from Yarn Art, 20-25 g;
- hook - number 2.5.
We take measurements from a hand
We find out what the girth of the hands of the future owner of mitts, and determine the desired height of the product.
 1 - arm girth; 2 - height of mitts.
Since the selected pattern is rather elastic, 1 cm can be subtracted from the grip value of the mitts. Due to this, the product will fit more closely to the hand.
Main pattern
Bars without nakid for the back half. We knit them according to the scheme.

Knitting pattern mitts will be made in the transverse direction. Our goal is to tie a rectangle with the width of one side equal to the height of the mitt. The length of the second side of the rectangle is: arm circumference minus 1 cm.
Knit a crochet mitt according to the scheme:

Working process:
Dial a chain of 30 VP + 1 VP lift. It is important not to type the chain tight. Then you should knit on the desired height of the rows sbn for the rear half loop. In this case, it will be about 32 rows.

Then we fold the knitting in half and sew 11 loops with a chain stitch, we knit 8 loops on one side only - this is a finger hole, then we sew 11 loops again.
 Hook seam crochet.
Fold the finished rectangle in half. Sew 11 loops with chain stitch. 8 loops knit semi-columns without nakida only one part. Then "sew" the remaining 11 loops with chain stitch.

Now we add fingers (see crochet knit pattern) according to the pattern. Finger fit in the following way: three circular rows connected by ordinary cn.

Simple mitts for beginners are ready for use as intended! A hat, scarf or snood created by the same pattern is perfect for such beautiful gloves without fingers.
How to tie openwork mitts

Such mitts perform a rather decorative function, but complete with another thing crocheted in the same style, look very impressive. So, how to tie crocheted openwork mitts that will suit all women and girls without exception.
Sizes of mitts:
34/36 (38/40) 42/44
Materials for work:
- yarn (75% cotton, 20% viscose, 5% Lurex; 90 m / 50 g) - 100 g ruby red;
- hook number 5,5;
- for mitts of size 34/36 additionally hook no. 4.5.
Knit lace pattern according to the scheme:

The number of type loops is a multiple of 10 + 1 loops.
Knit according to the scheme. Start loops before rapport, constantly repeat rapport, finish loops after rapport.
At a height of 1 times to perform the 1-6th rows, then constantly repeat the 3-6th rows.
Knitting density
15 p. X 7.25 p. = 10 x 10 cm
Working process:
Hook №4,5 (5,5) 5,5 to perform a chain of 41 vp + 1 incl. lifting and knit lace pattern. After 19.5 cm from the dial-up row, finish the part with 1 st. b / n Run the seam.
Master class on knitting mitts for girls

Knitting mittens for a girl with a crochet is a sheer pleasure, because often the work does not require knowledge of complex patterns, you can create a "mood" with simple decorative techniques, such as animal faces or cartoon characters, simple drawings or even a combination of non-standard color solutions. In this case, we will talk about cute bright mitts with a face of an owl.
Sizes of mitts:
A girl is 7 years old.
Materials for work:
- Yarn Art yarn of any color;
- hook by size of yarn;
- 2 black buttons for eyes.
Progress with step by step photos:
Knit a chain of 40 air loops. We close it in a ring. Then knit gum for mitts with owls, for which we continue to knit in a circle. In the first row in each loop of the chain we knit one column with a crochet.

In the next row we knit alternately one relief convex double crochet and one relief concave double crochet. We knit two such rows. Gum is ready, and it looks like this:

The next 12 rows of knit semi-columns with crochets. To form a hole for the thumb of the 13th row, we knit with a semi-column with a double crochet, leaving the last 7 loops untied.
We unfold knitting and knit semi-columns with no single crochet to the end of the row. We continue knitting, knitting 7 air loops, we close them to the beginning of the next row. Unfold knitting and knit again 5 circles in a circle with semi-columns with a crochet.

There is the last row, which consists of alternating embossed concave and convex crochets. The second one is knitted in the same way as the first, only the hole for the finger is knitted from the other side.
To make mittens for a girl more attractive, you can decorate them with an owl pattern. First, tie the eyes. To do this, in the ring of Amigurum we knit 6 columns without single crochet.
In the second row we make an increase from single crochets to each loop (12 p.). In the third row we add half-columns with a crochet (24 p.) To each loop. We fasten the loop, we cut the thread. We need to link four such eyes.

At the eyes we sew buttons, after which with a secret stitch we sew them on children's mitts. Embroider with red thread spout and feathers. We make out of the multicolored thread of the tassel for the ears. Funny mitts for girls ready!
Step by step description of knitting products for men

Men often choose a concise and even minimalistic style that will be suitable for all occasions. This also applies to the choice of insulation for hands. An excellent and versatile option for any man will be mitts knitted with simple patterns of thick enough yarn. Let's take a closer look at how to tie crochets for a man, while using very simple patterns - crochets. A step-by-step description of crochet knitting mitts will help even novice needlewomen with this.
Materials for work:
- half-woolen yarn weighing 100 g;
- black yarn 20 g for tying;
- hook to the size of the yarn.
We measure the girth of a man's hand in the widest place before work, or we measure his old gloves.
Progress with step by step photos:
Let's start knitting mitts from the top of the product. We collect a chain of air loops with a length equal to the measured circumference of the hand. In this case, the girth turned out 20 cm, which amounted to 37 air loops.
Tie up 9 rows with double crochets, starting each row with three air loops and ending with a connecting pole. In the 5th row, add 2 loops evenly so that the mitts are a little freer in place of the palm. The number of rows can be larger or smaller, it depends on the length of the fingers.
In the 10th row, leave a hole for the thumb. To do this, fold the mitt in half, in the middle notice 6 double crochets, which should be skipped, and tie 5 air loops, as shown in the photo.

Perform another 4 rows with double crochets. Alternating the front and back embossed columns, tie the elastic to the desired length. In this case, it turned out 6 rows. The thumb is four rows of double crochets.

In the finale we tie the top of the mitts and the thumbs with a “slithering step”. Men's mitts are ready.
Knitted mittens for women

Another type of mitts is warm crocheted mitts for women with a large volume pattern. There is also an element of openness in them, but the dense structure does not allow the hands to freeze in the cold season, and the absence of knitted fingers allows you to perform vital functions without much effort and discomfort. Well, the bright color of the yarn will definitely cheer up, even in bad weather.
Sizes of mitts:
7/8
Materials for work:
- yarn (54% alpaca wool, 24% polyamide, 22% wool; 199 m / 25 g) - 75 g bright pink;
- hook number 4.5.
Knit patterns
"Cones" knit according to the scheme:

Knit in circular rows on the number of loops multiple of 3 acc. pattern.
Start with loops before rapport, repeat regularly, repeat loops after rapport. 1-4th p. run 1 time.
Knit crossed Art. s / n
Knit, as the pattern "Cones", but 5-7th p. perform 1 time, then constantly repeat the 6th and 7th p.
Knitting density:
17 p. X 10 p. = 10 x 10 cm (on average).
Working process
Knit the right mitten. Run the initial chain of 39 vp, close into the ring using 1 conn. Art. and tie 6 krug.r. pattern "Shishechki", while after the 4th krug.r. 1 more time to repeat the 3rd and 4th krug.r. scheme.
Then knit with crossed st. s / n
After 6 cm from the beginning of the implementation of crossed article. s / n skip 7 p. for the thumb hole and tie 7 vs instead
In the next round. tie up these ce crossed by art. s / n
Through the next 4 cm from the hole for the thumb knit 2 krug.r. pattern "Cone" and work to finish. The left mitt should be knit similarly to the right.
Assembly
Tie a hole for the thumb on the edge of a crossed st. s / n, while in the 1st round. 5 times repeat rapport.
After 4 krug.r. from the beginning of the thumb to tie another 1 krug.r. "step by step" (= Art. b / n in the direction from left to right) and finish the work.
Videos for novice needlewomen
For beginners in any business, it is difficult to navigate the first time in recommendations for work, since they cannot know some details by inexperience. This also applies to crochet. In this case, practical video tutorials with master classes for beginners help to work faster and with better quality.
Video "how to tie beautiful crochet mitts":