Origami is not only a hobby, but also a way to add comfort and uniqueness to your home. Paper figurines are cheaper than statuettes and paintings, but no jewelry from the store brings to its owner so much pleasure from the awareness of the forces invested in the work. The admiring glances of the guests are the best compliment to the hostess. In this article, we will explain how to make a paper swan.
What is modular origami?
Modular origami, which appeared in the XVIIIth century, remains popular until now. This type differs from the classical origami in a large number of used sheets of paper. Folded according to the principle of classical origami into triangles, sheets are nested in each other according to the design method, giving unlimited scope of imagination and creativity.
When creating complex designs in modular origami glue is used, ensuring the reliability of the design. Strongly glued product will serve as a great toy for children.
How to make paper swan: instruction

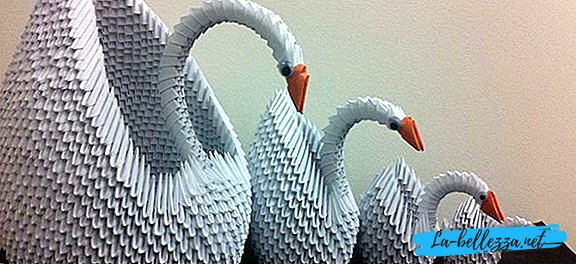
The majestic paper bird Swan, with due patience and perseverance, is done in an average of 40-50 minutes, depending on the size of the structure. This article provides a diagram of how to make a swan out of paper, 30-40 centimeters high.
In the manufacture of this model, there is a procedure in which it is folded, and if you follow it, you will not have difficulties.
Pre-prepared modules - multi-colored triangles. The body of the bird is made up of them. For the average model, you will need 458 modules in white (you can experiment with your color, we chose white) and 1 red, orange or pink for the beak.
Necessary materials
All we need is:
- scissors;
- glue;
- paper.
Swan is made of triangles that are folded out of paper according to the principle of classical origami. For them, you need to make 458 identical rectangles. The height of the whole figure will depend on their sizes. The aspect ratio of the triangles should be approximately 1 to 1.5. You can use halved squares of office paper, or cut A4 paper.
- If A4 sheet is divided into four lines along and four lines across, you can get 16 rectangles about 53 by 74 mm in size.

- If the A4 sheet is divided into 4 lines along and 8 lines across, then you get 32 rectangles measuring about 37 by 53 mm.

Preparation for work
How to make a paper swan using modular origami technique?
First of all, we add the modules themselves, of which we will constitute our design - the swan. They are made very easily.
We have a rectangle horizontally on the table. Then fold it in half.

In order to outline for yourself the middle line, you need to bend the resulting element in half, and then unbend it back.

Next, you need to bend the edges to the middle along the fold line. Depending on how you prefer, you can do it both to yourself and from yourself.

With a slight movement of the hand we turn the workpiece upwards.

We bend the corners sticking up, ideally - leaving a small gap between the upper and lower parts.

Now you need to raise the edges.

And finally - fold the triangle.

Here we have a triangle, which has two angles (fig. 1) and two pockets (fig. 2)

They can be fastened by different methods. The swan assembly scheme uses several of them.
When we have 458 modules of the required colors (however, they can be made as needed), it is time to start assembling the bird itself.
So, let's start the assembly of the swan!
To make the first two rows, we need to place three modules on the table like this:

Now we take the two front corners together and insert the third into the pockets:

Attach two more on the sides:

And two more:

And we see that we are holding in our hands a rapidly disintegrating construction that threatens to crumble on our table and destroy our hopes for the realization of the beautiful in life. But do not get upset: very soon this construction will become quite strong even without the help of glue. And in order to make it even stronger, you can start collecting three rows at once:

Fasten further on the familiar principle, so - 3 rows of 30 modules. When the rows are ready, carefully bring the ends together and put the edges of the last one into the other to get a circle.

We continue to fasten the fourth and fifth rows according to the already studied scheme:

When the fifth row is finally ready, and in front of us lies either a skirt or a Christmas tree, gently take it to the left and gently press the thumb with the thumb, turning the circle inside out.

Take the resulting saucer:

We bend the edges up so that the edges of the saucer become higher, and the saucer itself is smaller.

Next, we continue to mount the modules (do not forget: in staggered order), another row (sixth):

Turning to the seventh row, we begin to leave gaps for the neck and wings. We put on 12 modules and move away by two corners at an equal distance from each other. That is, the seventh row will be 24 modules and two intervals, each of two modules: one for the neck, one for the tail.

Now, from the eighth row, we will draw out the wings. We do not touch the gaps, we put the modules on the 12 remaining triangles, again - in a checkerboard pattern. The quantity will be 1 less - 11.

Further in each row we will reduce their number by 1, until we reach the tips of the wings of the swan made of paper, consisting of only 1 triangle.

In the process of making the wings, they can be slightly corrected by manually bending and making them more natural.
When the swan wings of paper are finished, turn the body of the swan to the side where we will have a tail. We do it by the same principle as the wings: in an odd order, with each row diminishing one by one.

The swan is almost ready, it remains to draw the neck and head. We do this with the help of 19 white modules and one color. The last color one, which will serve as our beak, is better to glue together before this, so that it does not look flared.
The paper swan neck is constructed using a different method. First, we need to position the modules with a wedge:

And combine them:

Combining the modules further, we assemble the neck, bending it along the way to the similarity of the question mark.
Finally, we solemnly put the beak in place, for reliability, wetting its inner sides with glue:

We attach the resulting swan neck to the remaining two corners:

Done!
You can decorate the head of a swan with a drawn, cut out of paper or finished eye, attach a bow to your neck, make a bottom in the form of a water lily. There are many opportunities for decoration. Unleash the imagination, and your creation will become even more original.