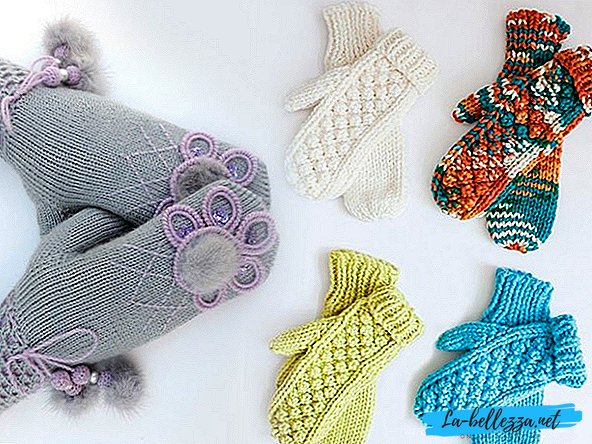
With the onset of cold weather, mittens are an indispensable thing in everyone’s wardrobe. It is very important to protect your hands from the cold, otherwise you can dry the skin leading to cracks and wounds.
How to knit mittens with needles for beginners step by step
 For knitting, we need: wool - 100 g, sp. x 4. Begin to knit with a cuff (the initial part of the product). The circumference of the cuff is measured according to the circumference of the brush.
We knit a rubber band 2 x 2, so that the number of loops gathered is a multiple of four. We collect loops on 2 sp., Then distribute by equal quantity to the rest. Knitting happens in a circle. Pay attention to the fact that the face loops (lp) are made behind the front walls, and the back (imp) - behind the back.
 Make a cuff 5 - 6 cm high, then go to the main pattern. We knit the main pattern in height too 5 - 6 cm and create a hole for the thumb.
Suppose we have 12 loops on each needle (jn).
Making a hole for the thumb on the third sp. according to the scheme:
1. We knit the 1st p., The following p. Remove on a pin or marker;
2. To another sp. we throw in air loops as much as we took off the pin;
 Knit further in a circle. We knit the product to the end of the scheme. After we have tied the main part of the mitten, we begin to knit the thumb.
 Drag the hinge shot on the pin on the joint vent. The number of loops for the thumb should be a multiple of 3. We knit loops in a circle, starting to reduce the loops from the thumb nail. When we have 6 loops left, stretch the woolen thread through the loops and tighten.
Knit mittens for men with ornament
 In order to associate men's winter mittens with the “Deer” ornament for beginners, we will need: yarn - 150 g., Knitting needles.
Basic patterns:
- gum 1 x 1 = 1 lp x 1 ip
- front smooth surface: lp
Knitting density: 16 p. X 18 p. = 10 x 10 cm
Working process:
Left mitten with an ornament for novice needlewomen:
Recruiting 36 p. On the ch. and distributed to 4 sp. We knit in a circle gum 1 x 1 of about 10 cm. We change the row between the first and fourth sp ... Next, we make the faces. Satin - 2 p.
We knit a pattern with an ornament according to the scheme:
1. on the 1st and 2nd sp. do 2 pp rapport A x 9 p .;
2. on the 3rd and 4th sp. knit 18 p. rapport C;
3. We repeat in rapport 1 of the first and second rivers, in rapports B and C we do from 1 to 24th rivers;
4. Starting from the 2nd row of individuals. Gladi perform additions for the thumb wedge:
but. on the 2nd j. knit loops according to the picture. When there is no 4 pt before the end of the row, then add 1 p .;
b. We knit 2 paragraphs according to the figure, then add 1 section again, and so on according to the figure. All added loops are included in our general drawing;
Repetitions are doing in every 2nd p. x 5 times. After we have completed all the additions, we make 1 row. In the next p. above the loops we collect new 2 items, and continue to knit in a circle up to 16 cm.
For the formation upwards, at the beginning of the 1st and 3-1 spokes, we knit 1 p., According to the scheme + 2 lp together. At the end of the 2nd and 4th knitting needles we knit 2 lp. together with a broach (remove 1 p. as a lp, then knit 1 lp and stretch it through the removed one), 1 lp These reductions are repeated in each row until we have 9 p.
Take the scissors and cut the thread. Pull the thread through the loop and tighten.
Next, knit thumb. Left loops we overtighten on a joint venture. and knit in a circle according to the picture. 6 cm knit faces. stitch, tying rapport A.
When we reach the fingernail nail, we begin to reduce the loop. For this, we knit 2 lp. together until 4 p. remain. Take the scissors and cut the thread. Pull the thread through the loop and tighten.
Right Mitten: fits like a left, according to symmetry.
How to knit mitts with needles for beginners
 Mittens mitts - Fashionable winter accessory for the winter image of a young needlewoman. After reading the article, you can independently knit mittens for beginners.
For knitting mitts, we need: thread - 100 g, knitting needles x 5.
In order for the mitts to sit well on the arm, we will slightly reduce the number of loops. So, we knit 44 p., Then after 5 cm we reduce their number to 40.
 We collect loops, and we start knitting from a 1 x 1 elastic band about 5 cm (1 lp x 1 ip) We evenly distribute the loops on 4 sp., So on 11 items on each.
 After we have finished knitting the gum, we reduce the amount of p. Tying 2 lp together and proceed to the main pattern.
 The first 2 needles - the front of the mitts, the rest - the bottom. We knit the lower part only of the HP, and make the front part according to the “double rice” pattern.
 We make 1 bc., We knit 2 lp together for the "wedge". The main pattern is very similar to the elastic 1 x 1, but with an offset along the rows. Knit 2 p. according to the figure, the following change direction - above lp knit ip and vice versa. Thus alternate rows, changing direction. After 4 rows, we knit a "wedge", starting with 2 points of the first jV. We make gains, knit 1 p., Make a cape (n.), Then 2 p. + N.
 We work according to the picture. In the next p. nakida knit lp We reach the base of the thumb. We knit 1 p. Of the first knitting needle, then remove 9 p. On a pin, and make 4 air loops. Next, knit nkidy l. In the next row we knit these loops by 2 together.
 Toward the end again go to the knitting gum, then close the loop.
 Go to knitting thumb. Add to 7 p. Another 7 (= 16 p.). Distribute 4 p. For each JV. and knit lp - 6 p., Then gum.
 Knit several rows of elastic and close the loop.
Left mitten mitten ready!
Symmetrically we knit the right mitt in a similar pattern.
How to knit mittens with needles for beginners on 4 needles
 Knitting warm mittens is a hot topic during the cold season. In order to tie their beginner needlewomen we need: wool - 160 gr., 4 knitting needles.
Knitting density: 1.7 n. X 1 cm
Before you start knitting simple mittens, measure the girth of the brush. We got 20 cm. Mittens knit on 4 sp. round
 We calculate the number of loops: 20 cm x 1.7 = 34 p. Next, divide them by 4 sp .: 34: 4 = 8.5. Round up to 9 p., So we type 36 p. For each sp. 9 p.
Working process:
Knit the first mitten. Mentally divide 4 bc. into 2 parts - lower and upper. Thus the first 2 sp. - lower part, the rest - upper.
We begin to knit the cuff with a rubber band 1 x 1. We alternate the colors of our mittens every 3 rows, so we knit up to 5 - 7 cm.
 Next, do the main part of the mitten in a circle, to the base of the thumb (approximately 5 cm).
Hole for fingers do on the 1st sp. for the right mitten, and for the 2nd for the left. We knit 1 p. On 1 ch., The rest we knit with facial ones, and return to the 1st j. So we should get a hole. Next, knit in a circle until the end of mating (8 cm).
 Making a toe. To do this, we reduce the number in the ranks. On the 1st and 3rd sp. at the beginning we make 2 l. together, and on the 2nd and 4th knit 2 lp in the end. We knit until 2 p. Remains, we close them.
Back to the knitting thumb. We should have 7 loops on one ch., 6 - on the other. Next, we work according to the scheme, at the end of reducing the loop. The remaining 1 loop is closed.
 We make the left mitten symmetrically right.
Warm mittens are ready!
Knitting openwork mittens on two needles
 For knitting openwork mittens on 2-needles for beginners we need: wool - 120 gr., C.
Do the back part:
1. Recruit the needles for the required number of loops (depending on size);
2. Work as a rubber band 1 x 1 or 3 x 3, as you like. Approximately 8 cm;
3. Knit the main pattern to the little finger;
4. Turn down the loops and close the knitting;
Making the front part:
1. Recruit the needles for the required number of loops (depending on size);
2. Knit a rubber band 1 x 1 or 3 x 3, as you like. Approximately 8 cm. Making a hole for the thumb;
3. We divide all the loops into 4 parts. 3 parts remove the pin;
4. The rest of the recruit on the ch. and we get as many loops as we have on the joint venture ... We knit the thumb, close the loops;
5. We work with the main pattern;
6. Turn off the loop and close the knitting;
7. We connect 2 parts;
Baby mittens knitting scheme and description
After reading the article you will learn how to knit children's mittens for beginners on their own. In order to tie them you need: strings and sp ...
Guided by our description and diagrams, you can easily cope with this task, even if you are an aspiring needlewoman.
 For knitting mittens with an ornament we need: 25 gr. different color threads, knitting needles, large needle.
We collect 32 p., Closes in a circle. Knit in a circle 17 p. rubber band 1 x 1.
 After the elastic we add in a row 5 p., Alternately changing the color of the yarn. After 14 p. from the gum make a hole for the finger. We knit 22 lp from the back side. We knit 7 HP, and throw them back. Next, do the main part to the end. At the end we reduce the loop and close the binding.
 We knit the thumb on the mitten. Take the loops, and add up to 16 p.
 Knit 14 p. in height and subtract n. At the end close the finger.
We make the second mitten similarly to the description.
Knitting mittens with ornament for children
 In order to knit children's mittens with ornament we will need: yarn - 200 gr., Knitting needles x 5.
We collect the required number of loops, make 5 cm with an elastic band of 1 x 1. We look according to the description of the scheme.
We make the main part of the product (5 cm), add 2 items in a row.
Making a hole for the finger. For the right hand we make a hole on the 3rd spoke, for the left - the 4th.
On every cn. 12 p. Hole do on the 3rd. First knit the loop, the remaining 10 are removed on a pin. On the right needle we collect 10 loops and then we do the main part according to the description.
After the end of the main part, we return to the big finger. We transfer the loops from the pin to the needle, adding loops so that the total number is a multiple of 3.
Distribute the loop on 3 needles, knit in a circle. At the end of knitting, we reduce the loop and close the binding.
The second is done symmetrically to the description of our scheme.
For girls mittens with braids knitting scheme and description
 We collect 52 p. And knit in a circle 40 p. rubber band 2 x 2. Next, add another 2 p. And work according to the scheme:
 1. The finger will start after 10 p. the main pattern.
2. On the sides add p. 3 times, thus on the j. 20 p are formed
3. Put aside the item on the pin. We type the missing loops, knit according to the scheme.
4. We do the main part according to the scheme. At the end close the loop.
Baby mittens knitting scheme and description for 3 years boy
 In order to knit children's mittens for the 3rd boy, we will need: yarn - 200 gr., Knitting needles x 5.
We collect the required number of loops, distribute on each joint ... We make the cuff with an elastic band 1 x 1, about 5 cm (the number of loops is briefly 4). The first and second sp. - the upper part of the product, the rest - the lower.
We make the main part of the product (5 cm), add 2 items in a row.
Making a hole for the finger. For the right hand we make a hole on the 3rd spoke, for the left - the 4th.
On every cn. 12 p. Hole do on the 3rd. First knit the loop, the remaining 10 are removed on a pin. On the right needle we collect 10 loops and then we do the main part according to the scheme.
 After the end of the main part, we return to the big finger. We transfer the loops from the pin to the needle, adding loops so that the total number is a multiple of 3.
Distribute the loop on 3 needles, knit in a circle. At the end of knitting, we reduce the loop and close the binding.
The second is done symmetrically to the description of the first.
Details of the birds crochet st. b.n. Sew on the place of the eye beads.
How to knit mittens with knitting needles
 For knitting mittens with a pattern we need: wool - 120 gr., Knitting needles.
We work according to the description:
1. We type on the joint venture. the required number of loops (40 p.);
2. Knit a rubber band 1 x 1 or 3 x 3, as you like. Approximately 8 cm. Making a hole for the thumb. Remove the loop on the pin;
3. We make the main pattern the main part;
4. Turn down the loops and close the knitting;
5. Go back to the thumb and knit according to the scheme;
6. We connect 2 parts;
Knitted mittens knitting for baby video
On the Internet, there are many free video lessons on how to knit children's mittens step by step. For this we need: thread - 150 gr., Knitting needles.
See detailed master class on the following video.
Beautiful patterns for mittens knitting scheme
Here is a description of several beautiful knitting patterns:
1. Openwork braids. Rapport pattern on the diagram is indicated by a red rectangle. The number of rows in rapport - 10, loops - 18. Empty cells - front. In purl p. we make facial loops purl.
 2. Openwork leaves. Rapport pattern 16 p. (Blue). In empty cells - lp
 3. Openwork chess. Rapport pattern 13 p. In height, repeat the pattern from 1 to 24 p. Nakida knit IP, purl p. according to the scheme.