Crocheting is so extensive art that even tying the edges of a variety of products allows you to choose from a variety of options. Moreover, such a detail as a crocheted hem can give a simple thing, like the most ordinary dress or blouse, an elegant sophisticated look, or, conversely, turn a product into an absurd look that you don’t want to wear, even if it turns out to be the only one in the wardrobe. Therefore, it is so important to learn how to combine crochet styles and successfully apply them in the details that play a role in shaping the style — crochet edges of the product.
Tablecloths, handkerchiefs, napkins, towels, curtains, sleeves and neck of any component of the wardrobe will look completely new, if you choose the right pattern for crocheting the edges. By the way, this technique is also used if there is a need to “hide” the mistakes of the skilled worker, which with the naked eye can be easily seen at the edges of the products. And also finishing the edge with different knitted patterns capable of giving a second life to any old little thing that you don’t want to part with.
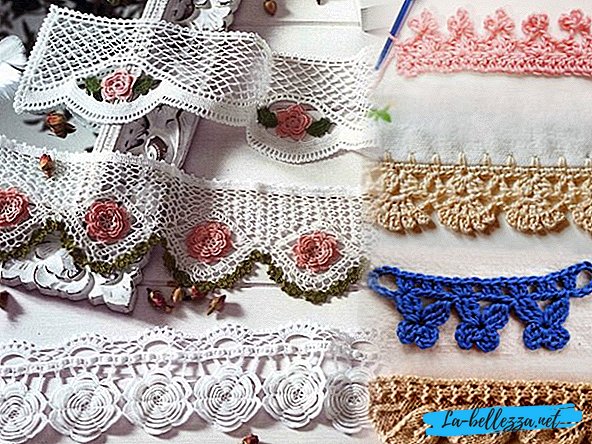
Crochet product edge trim - diagrams and description
To choose the right pattern on the hem is half the success. This issue has its own subtleties that are important to consider when choosing a pattern for the edge of the product:
- Narrow border (up to 1.5 cm) - suitable for light knitted items with lace motifs, as well as ideal for children's clothing;
- Collar rim(5-8 cm or 15-20 cm) - combined with most knitted things.
- Wide pattern finish(1.5 - 4.5 cm) - looks good on products of yarn of medium thickness, namely, at the edges of the sleeves and neck of jumpers and pullovers.
A beautiful pattern around the edge can be knitted directly when creating the whole thing - then you will not have to suffer by fitting the openwork tape to the product, or you can sew a ready-up hem by linking it in advance. Here the choice is quite simple.
But the options for trimming the edges provide much more space. So, what are the possible options for finishing and decorating the edge of a crocheted product with needlewomen?
- Rachy step

The most favorite option for crocheting the edges among the beginning knitters is a punchy step, consisting of crochets that fit right to left: from the right of the work loop. This pattern allows you to maintain the original shape of the canvas, not allowing the edge to stretch. This type of strapping has its own varieties.
Pitchy step from left to right
The hook is inserted into the first loop on the right and knit a column without a nakida. Insert the hook into the next loop on the right and again knit a single crochet. And so on until the end of the series.
Right from left to right
This option of tying the edges is considered more complex, but also more familiar. With a working loop on the hook, insert the hook into the loop on the left and grab the working thread. Pull out the thread and turn the hook spout counterclockwise with both loops on the hook (see diagram above). Having twisted the loops on the hook, make a cape and stretch it through both loops on the hook. With one working loop on the hook, we insert the hook into the loop on the left (by moving away from ourselves) and grab the working thread. Pull the loop. After twisting the loops on the hook, make a cape and pull it through both loops on the hook. Continue in the same way. The resulting happy should look something like this.
- Picot
 Schemes options for knitting pic pic crochet.
The picot harness is enclosed in a circle of chains of several air loops - from three or more. Such loops are ideal for strapping cuffs and sleeves.
A series of picot perform on the front side of the product. Make 1 air loop, skip the first column without nakida, knit 1 column without nakida in the next column without nakida. Tie a chain of 4 air loops, then follow the half column in the first loop of this chain to make a picot. Tie on 1 column without nakida in each of the next 2 columns without nakida. Continue to knit pico and 2 single crochets along the edge of the product in the same way. There are also several other picot knitting options (see diagram above).
- Arched or Cockleshell

The pattern is obtained when knitting loops of different heights from the highest loop in the center. The shell can be made in a row, connected with single crochets, double crochets and double crochets. The strapping is performed on the front side of the product. Make 1 air loop, crochet 1 single crochet into the next loop. Skip 1 loop, complete 1 double crochet, 3 double crochets, and 1 half double crochet - all into the next loop. Skip 1 loop and knit 1 single crochet into the next loop to secure the edge of the shell. Continue to fasten the edge of the product with the shells in the same way.
- Decorative Lace Pattern Border
Here the form and all sorts of schemes are not limited to anything except the imagination and possibilities of the knitter. There are many variants of crochet lace, from simpler to incredibly complex. Often they are crocheted separately from the entire product and then sewn into the desired edges. Consider several schemes and methods for their use on different things.
Neck trim
Very often, needlewomen are looking for ways to crochet the neck of a sweater or sweater to hide the open sections of the product, and at the same time the thing has become more interesting and special look. There are many ways to do this, you just have to choose from the dozens of schemes the most suitable style of binding. Let us consider several examples of how to crochet a neck beautifully in order to improve the look of a knitted thing and not to ignore the principle of completeness.
- Quick tying neck

This step-by-step design option is suitable for beginners and those needlewomen who do not have time to perform more complex neck processing. It turns out beautiful and simple.
A related product can be decorated with a neck made in a circle, or to connect the ends of the neck seam.
Take the finished canvas and hook from the seamy side of the working thread pull the loop on the front side.
Thus we gather on the hook a few loops. Important: loops should not be dialed freely.

Then these loops are transferred to the needle, after which we continue to loop the loops using the hook. With a hook, we pull out the eyelet, transfer it to the knitting needle, etc.

Loops recruited. Now we knit the first row so that there are facial loops on the inside, and purses on the front row. If we tie a neck in a circle, we knit back loops. If with a seam - facial.

If you want to achieve a “factory effect” connecting the collar with the product, knitting the first row with knitting needles is as follows: on the wrong side of the product, the first row is knitted with front loops (on the front side, the loops will be wrong), and then the first row on the front side looks as if the collar is pasted a needle.
According to the first variant of knitting the first row, the following result is obtained:

Then knit the neck of the desired length. If it is a loop top, close it with knitting or crocheting, if desired. If it is a stand-up collar, it is better to close the loop with a needle.
- Beautiful neck finish

This is also an uncomplicated version of crocheting a beautiful edge, in which the most difficult and important thing is to correctly calculate the rapport of the pattern.
The height of rapport is the width of the plank. The width of the rapport is the number of loops by which the number of loops of the entire neck length is divided without residue. For example: the height of the strap is 16 rows. 16/2 = 8. Rapport can not be less than 8 loops. On 8 loops we will have an openwork decker.
In this case, the neck 180 loop. The selection method was determined rapport 12 loops 180: 12 = 15. 15 reps rapport.
Better to have 2 extra stitches for stitching the strap. In my case, this is not the case, but the difference in the neckline on the shoulder line is not noticeable.
It is necessary to knit according to the following scheme, in which only odd rows are indicated:

- Flower pattern

The pattern for the strapping consists of a bush from a chain in three air-loops and two table-beats with a naki-house. It is found out from one point - the basis of the chain. The bushes are fixed by a semi-table-bi-com on some kind of distance from each other (for example, in two loops of anchored a la row of the mountain ). At the beginning of the row, make one air-loop loop for lifting. Follow the pattern.

Beautiful sleeve processing
Often, crocheting the sleeves is done in the same pattern as the neck processing - so the thing is designed in the same style, which means it looks harmonious. Let's try to tie a few simple patterns.
- Festoons for sleeves

First of all, dial a chain of 5 air loops.
Insert the hook under the dialed chain, grab the working thread and pull the loop.
Re-seize the working thread and knit an elongated loop. Thus, the first column without crochet tied from under the chain was obtained, and 2 loops remained on the hook.
Next, knit another 9 columns without nakida from under the chain. Also enter the hook under the chain, grabbing a working thread pull the loop.
Tie an elongated loop, add another loop to the hook.
When the hook has 11 loops, grab the worker thread and tie all the loops off the hook.
Now secure the scallop by knitting the crochet by stepping on 3 loops from the beginning of the scallop. Knit festoons to the end of the row, following the step by step photos.

It is necessary to work according to the following scheme:

- Large lace hem

At the beginning of the row tie the air loop. Insert the hook under the nearest pigtail tied edge. Knit a column without nakida. Knit the air loop again.

Insert the hook into the front loop of the upper pigtail of a single crochet post, knitted earlier, and then insert the hook into the left side loop of the same post without a crochet. Insert the hook under the nearest pigtail tied edge. Pull out the loop. Pick up the thread and knit the column without nakida. Repeat from 4 to 8 points. The result is such a strapping edge, which, due to its elasticity, will not tighten the bottom of the product.

Bottom of the product
You can crochet the bottom of the product in a variety of ways, but we will consider one of the easiest options, and a more complex and beautiful way of strapping, suitable not only for knitted items, but also for towels, tablecloths and other products made of material.
- Pico bottom trim

At the edge of the product, start knitting with two single crochets.
Next, perform 3 air loops and direct the hook to the base of the single crochet as shown in the photo. Then follow the two single crochets again and 3 air loops after them.

- Flower border

A series of floral motif fit in the following way: 3 vp lift, 3 CCH in the first arch of the ce, 1 CCH into the next arch. We begin to knit a flower: 3 VP, 3 unfinished CLS on one loop of the base, knit all the loops on the hook = 1st petal. 4 vp, remove the hook from the knitting, enter into the upper part of the associated group of columns from right to left, grab the last loop of the chain and drag it through all the loops = ringlet.
The next petal: * 3 vp, 2 SSN in the ringlet, 3 vp, SBN in the ringlet * (= 2nd petal), repeat from * to * 2 more times. Last petal: 3 VP, 3 unfinished CLS, tie all the loops on the hook (= 5th petal). Flower ready.
3 CCH through one arch of the previous row, 1 CCH into the next arch, and begin to knit the next flower.

Video lesson
Decorating the edges of crocheted products is not an easy task, because you first need to choose a beautiful pattern, then tie it correctly and without unnecessary broaches, and then sew it so that it looks perfect, and most importantly - in its place. It may be difficult for beginning beginners to cope with this task at first, but do not despair. You can always "peep" the secrets of this craft from more experienced craftswomen.
Crochet product edge trim video: