If you are a needlewoman, for sure, you had a desire to please your beloved child with a homemade new thing. Children love hand-made toys, because they are pleasant to the touch, and, most importantly, made with love.
As a material, you can use old unwanted clothes (tights, skirt, t-shirt, shirt, dress, pants, overalls, jacket, pants, shorts, jacket, pajamas, pants, sweater, jeans, bathrobe, jacket, sundress, swimsuit, shirt, socks and even a coat).
After selecting the material proceed to the lesson with a detailed description of the whole process.
How to sew a doll with your own hands quickly and easily at home
Having detailed lessons from an experienced master in his arsenal, even a novice can quickly and easily sew a textile doll. To do this, be patient and necessary tools (fabric, thread, needles, scissors, crayons, pattern). With such a minimal set, you can create any model you like.
How to sew a doll of nylon pantyhose (step by step photo)

Head
We start the product with the most difficult - with the head.
For it, you will need a cut piece of flesh-colored tights, a piece of sintepon of their old jacket or pillow (although you can also buy a new one in the store - it is quite inexpensive) and two darning needles with skin-colored threads.

A lump of a synthetic winterizer is put in a bag of caprone, another smaller ball is inserted in front - for the nose. First form the nose with a needle and thread. Then you need to make a hollow for one nostril. Also make out the second nostril.

Looped nose from below. Increase one nostril, then the second. Now, after making the spout, you need to increase the cheeks through the lower incision in the pouch - near the neck.

Sticking fillers on both sides of the spout, insert a small sausage into the lips. We turn on the second needle and form the corners of the lips and hollows for the eyes - the sockets. Between the corners of the lips stretch a loop - a smile.

While working, you should not cut the threads - all parts should be carried out "on a single sigh. As you work, you need to straighten the filler, putting it more evenly or gathering it in the right places. We also form the lower sponge with the help of an eyelet.
As the lips are embroidered, the needle appears in the eye sockets, so that they begin to resemble "boats" rather than points, as it was at the very beginning. The needle should be placed in the middle of the upper lip to make a sponge bow.

With a coupler of the eye-socket-corners of the lips, the master achieves the charming smile of his future creation. On the other hand, doing similar actions.
You can achieve a smile, with which the mouth slightly opens. Now you need a little lengthen the nose.

Eyes for a doll can be bought in a specialty store for needlework or replaced with colored buttons. You can glue nylon rollers around the eyeball, which will imitate the eyelids.

Hair
One wig is enough for two pupae, if it is cut into separate strips of which it consists. The strip is twisted "snail" and secured with thread. Then this "shell" is sewn on top of the head. The remaining stripes, one after the other, fasten around the snail, sewing the needle. Hair can be decorated with ribbons and hairpins for little fashionistas.

Torso
First, make a frame for the body, which will hold the whole body. If the pupa is planned to be half a meter, then the wire will require about thirty meters. Having folded it as necessary, the “skeleton” needs to be fastened in some places with tape or scotch tape.

Ladoshki MK
1. For the palms, too, you need to make a frame that is wrapped with padding polyester. Small square pieces, cut off from the tights, will serve as skin for the hands.
2. A capron stocking is pulled on each hand and tied with a knot on the "wrists".
3. Fingers and legs are formed in a manner already known.

Body
The hands are screwed to the skeleton skeleton, the head as well. Then the body is formed by wrapping the wire with padding polyester. Kapron also covers the rest of the body, armpits are made out with the help of threads and needles, and the joints of the palms and hands are hidden.

The dress
As for a doll to sew a dress every woman knows, therefore at this stage you can give free rein to your imagination.
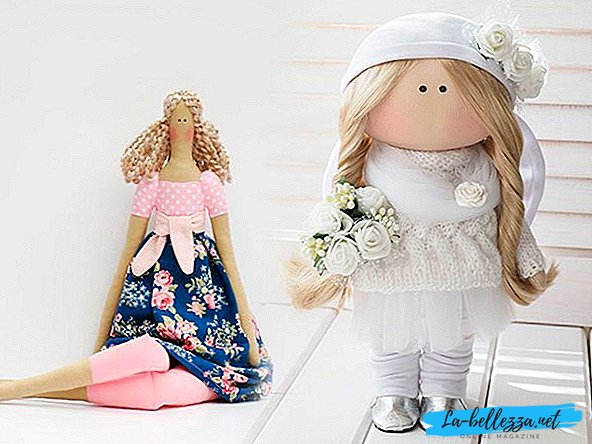
How to sew a tilde doll
There are a lot of variants of tilde pupae, and they all amaze with their various sweet images - there are no beautiful women among them! These amazing items are not just toys. For many years, tilde dolls decorate the homes of millions of people around the world, and it is not surprising, because their fans perceive these little fairies and angels as a talisman and amulet.


For sewing any doll you need a pattern. Also prepare the necessary materials and tools.
For work should prepare the necessary materials and tools:
- first of all, as well as to create any such doll, you will need a pattern (you can simply print it from a computer);
- natural flesh-colored or beige fabric for tailoring the body of the pupa;
- filler (holofiber, synthetic winterizer, cotton wool);
- knitting needle or wooden stick (to help yourself when stuffing);
- fabrics for dress;
- ribbons, lace, buttons and other decorations;
- acrylic paint or pencil and blush;
- material to create hair (thread, yarn, tress - optional).

So, let's start with a master class on sewing a tilde in a cup.
- Choose a pattern, depending on whether you want to sew a doll, small or large. Print it out and transfer it to a flesh-colored fabric (the fabric should be folded face down in half).
- Then you need to lay a running seam so that it runs along the bottom of the tilde's body.
- Take the filler and stuff the doll. When completely evenly distribute the packing, sew the product. Handles must be sewn to the body almost near the neck.
- For a dress, take two pieces of rectangular fabric and fold them together (inside out). Transfer to the dress pattern on the fabric, sew on the sides. Then you need to iron the allowance at the top of the clothes and small corners on the sides. Remove the dress, also walk on it with an iron and wear it on the doll. Sew it first with tack seams (along the hem and neck edges), well tightening the thread. Also with a collar. Then sew finally.
- It is better to make the hairs for this pupa out of the boucle yarn, and to paint the face with acrylic paints and rouge. Attach a small rose to your hair and sew the tilde handle to your mouth.
- Now you need a beautiful cup. Smear her bottom with glue and seat the doll there. To hang it, attach a small loop.
In order for your little angels to have legs that can be bent, first fill them in half, then make a line across and only then continue the packing to the end. It is better to fill all parts by helping yourself with a wooden stick or a knitting needle. Complement the image of your tildoks with different elements, giving it individuality and uniqueness: give a pen to a heart, a bouquet of flowers, a stylish handbag, a basket or a book.


Video lessons in stages "how to make a rag doll"
It is possible to please children with such a beautiful toy with a very realistic face. A beautiful face with folds and a magnificent dress will not leave indifferent the kid.
As a supplement you can come up with a beautiful handbag, underwear, boots.
A heating pad on a teapot from the kitchen cloth - a master class for beginners
As an ornament is the national Russian folk costume, and the material is capron.
Pumpkin head
If you do not know how to sew clothes for Barbie dolls, lalalupsi, baby bon, ever after high, monster high in our article “How to sew a dress for a doll” you will find a lot of valuable and useful information.